Privacy Policy

Privacy Policy

Privacy Policy

venerdì 25 novembre 2016

MY "BENDI" ADVENT CALENDAR AND A BIG SATISFACTION!!!


Ciaooo!!! Oggi sono davvero stra felice!!! Alle volte basta davvero poco!!! Già, una mia card è stata pubblicata in un articolo su scrapbook.com e per me vuol dire molto...SODDISFAZIONI!!!!
Hi my dears!!!! Today I'm so happy!!! One of my card has been feautered in a scrapbook.com article and for me it really means a lot!!!!

Cambiamo discorso. Natale è sempre più vicino....avete preparato i vostri calendari dell'avvento?!
Questo è quello che ho preparato io per la mia polpetta e devo dire che ne vado abbastanza fiera.
Anyway, Christmas is getting closer...are you ready with your advent calendar?!
Today I'm here to show you the one I made for my little girl and I have to admit that I'm quite proud of it.


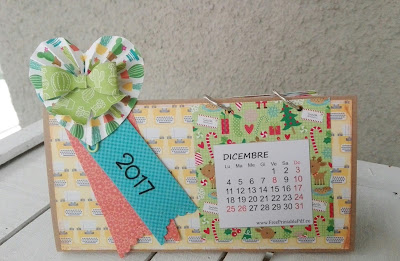
Come potete vedere, ho realizzato il corpo del mio calendario seguendo le istruzioni per fare una "bendi" card e ne ho aumentato un po' le dimensioni ( qui potete trovare un tutorial step by step su come realizzare questo tipo di card).
As you can see, I made the body of my calendar following the instructions for a bendi card, but just a little bit bigger ( here you can find a step by step tutorial).


Quando ho visto il Babbo Natale sull'aereo della Doodlebug Design me ne sono subito innamorata e così ho deciso di metterlo sul mio cielo e ho immaginato che lasciasse cadere una pioggia di caramelle. Per tagliare il bordo delle nuvole e quello delle colline, ho usato una fustella di Mama Elephant, mentre per il bordo con tutti gli alberelli mi sono servita di una fustella di Lawn Fawn.
When I saw the Doodlebug Design's Santa Claus on a plane it was love at first sight, so I decided to put him on the top of my "sky" and I imagined that he let folling down some Christmas candies.
For die cut the clouds and hills stiched borders I used some Mama Elephant dies, while for the forest border I used a Lawn Fawn die.


Poi ho aggiunto 25 piccole bustine (realizzate con carta da pacchi e washi tape), che riempirò con caramelle, attività e qualche breve racconto, e le ho decorate con il foglio di carta "Christmas Countdown" from the 6x6 "Here comes Santa Claus" paper pad ( di Doodlebug Design, ovviamente!!!)
Then I added 25 little paper bags (made with craft paper and washi tape), that I'll fill with sweets, activities and some short tales, and I decorated them with the "Christmas Countdown" sheet from the Doodlebug Design collection "Here comes Santa Claus" 6x6 paper pad.


Mi sono davvero divertita un mondo nel realizzare questo calendario e spero tanto che a Emma piaccia...del resto è allegro e vivace propio come lei!!!
I really had a lot of fun making it, so I hope Emma loves it a lot...it's joyful and bright just like her!!!


Bhè, è tutto per oggi. Grazie per essere passati e buon week-end a tutti!!!! Silvia.
Well, that's all for today. Thank you sooooo much for stopping by and HAPPY CHRISTMAS CRAFTING!!!! Silvia.

domenica 20 novembre 2016

DESKTOP CALENDAR...UN'ORIGINALE IDEA REGALO FAI DA TE!!

Ciao e benvenuti al Handmade Christmas 2016 -gifts-, il primo dei tre appuntamenti che il team di "The Creative Factory" ha deciso di dedicare al Natale.
Hello and welcome to the Handmade Christmas 2016 -gifts-, the first of the three appointment that "The Creative Factory" team has decided to dedicate to Christmas.

Come avrete capito, oggi si parla di regali fatti a mano e io ho pensato di realizzare per l'occasione un calendario da scrivania, che fa sempre comodo.
As you will have understood, today we talk about handmade gifts and I thought to make a desktop calendar for the occasion.


Realizzarlo è facilissimo. Prima di tutto, ho scaricato e stampato questo calendario del 2017, e ho tagliato tutti i quadrati dei vari mesi.
It's so easy to make! First of all, I downloded and print this 2017 calendar, and then I cut all the months.


Poi ho tagliato 12 quadrati da 3"3/4 per lato da diverse carte per scrapbooking (le mie appartengono a differenti collezioni di Doodlebug Design), vi ho incollato i mesi e ho fatto due buchi per gli anelli in alto. Io ho scelto di usare per ogni mese una carta che lo richiamasse, ma potete anche usare un solo sfondo per tutti i mesi.
Then, I cut twelve 3"3/4 squares from different scrapbook papers (mine are from different Doodlebug Design collections), I glued on them my months and I made two hole for the rings.


Ho poi piegato un cartoncino in formato A4 prima a metà e poi a 1"1/2 da entrambi i lati e li ho incollati insieme con della colla a caldo.
 I fold an A4 cardstock in half ; then at 1"1/2 from both side and I glued them together with some hot glue.


Ora tutto quello che vi resta da fare è confezionare il tutto e decorarlo a piacere.
All you have to do now is decorating as you like.


Ecco alcuni dettagli.
Here's some close-ups.


Bene, è tutto per oggi, ma non dimenticate di andare a dare una sbirciatina in tutti i blog delle altre creative che hanno partecipato a questa incredibile raccolta. Silvia.
Well, that's all for this time, but don't forget to go taking a peek at all the other incredible projects of this collection. Silvia.


Banner realizzato da Norma Ricaldone


martedì 15 novembre 2016

SNOWMANAHOLIC!!!


Ciaoooo!!! 
Oggi vorrei condividere con voi due card che ho realizzato con uno degli adorabili pupazzi di neve di Paper Smooches.
Hi to everyone!!!
Today I'm here to share with you two cards I made with the soooo A-D-O-R-A-B-L-E Paper Smooches snowmen.

La prima è una wobbler card con un pupazzo di neve che fa il giocoliere.
The first one is a wobbler card with a juggler snowman.


Ecco alcuni dettagli
Here are some close-ups...


...e un breve video.
...and a short video.


La seconda è una pop-up card, realizzata con il "Freezy Fellas" stamp set di Paper Smooches e uno stamp digital che potete scaricare gratis dal loro blog.
Ho anche usato delle carte della Doodlebug Design, un timbro di Clearly Besotted e delle fustelle di Lawn Fawn e Mama Elephant.
The second one is a pop-up card feautering Paper Smooches "Freezy Fellas" stamp set and a digital stamp that you can find for free on their blog.
To finish my card, I also used some Doodlebug Design papers, a Clearly Besotted stamp and some Lawn Fawn and Mama Elephant dies.

Ecco alcune immagine della card vista da fuori.
These are some pictures of the outside of the card.


Ed eccovi il dentro della card.
And here you can see the inside of the card.


Grazie per essere passati a curiosare anche oggi e a presto, Silvia.
Thank you sooo much to stop here taking a peek today. See ya soon, Silvia.

giovedì 10 novembre 2016

LA MIA PRIMA VOLTA COME GUEST DESIGNER (MY FIRST TIME AS A GUEST DESIGNER)!!!


Ciao a tutti...come state?! Io ho passato davvero un gran periodaccio nelle ultime settimane. La mia bimba (e ovviamente, io con lei) ha trascorso 8 giorni in ospedale per la porpora (una vasculite). Fortunatamente non è nulla di grave, ma è una malattia lunga, noiosa e capricciosa e Emma deve stare a riposo forzato per un bel po' (circa un mesetto, che per un bambino è un'eternità).
Hello to everyone!!! How are you? During this last weeks I went through a difficult period. My little girl (and me with her) spent 8whole days at the hospital for a purpura. Luckily, it isn't anything of serious, but it's a long and capricious illness, 'cause Emma has to rest for about a month (that is an eternity for a child!).

Ma cambiamo discorso e veniamo a qualcosa di più "frivolo".
Anyway, let's talk of something more cheerful. 

Il mese scorso ho vinto il dream card challenge #9.16 organizzato dal blog Scrap Dreams e così questo mese sono la loro Guest Designer. Sono così emozionata...per me è la prima volta come guest designer!!!
Last month I won the dream card challenge #9.16 on the Scrap Dreams blog, so  I'm their Guest Designer for this month. It's the very first time for me, so I'm sooo excited about it!!!

Eccovi allora la card che ho preparato per il dream card challenge #11.16.
This is the card I prepared for the dream card challenge #11.16.


Per questo challenge vi è un solo vincolo, che è quello di non usare timbri di nessun tipo.
For this challenge there is an only bond: no STAMP, so...

Ho pensato di realizzare una card natalizia con una finestra che si apre su di un tenerissimo Babbo Natale in vespa (le carte usate fanno tutte parte della nuova collezione di Natale della Doodlebug Design dal nome "Here comes Santa Claus").
I thought to make a Christmas card with an open window on a super sweet Santa Claus on a motorbike (everything is from the Doodlebug Design "Here comes Santa Claus" collection).


Per creare la finestra mi sono servita di un acto knife (o taglierino).
To make the window I used my acto knife.


Un nastro un po' fru-fru e scintillante ed ecco la card pronta per essere spedita.
I added a funny and sparkly ribbon and the card is ready to be send.


Per oggi è tutto. Spero che la card vi sia piaciuta e ci risentiamo presto. Silvia.
I hope you like it and see ya soon!!! Silvia.