Privacy Policy

Privacy Policy

Privacy Policy

lunedì 22 novembre 2021

SWEET CHRISTMAS CRESCENT CREATION NOVEMBER RELEASE

 Hello crafty friends and welcome to the Sweet Christmas Crescent Creation new digital release!

To celebrate it we are taking a fun and so inspiring blog/YouTube hop and I hope you'll play with us and remember that for a chance to win a $25 gift certificate you have to leave a comment at each stops and follow all the hop makers.

For my card I used the cute "Together for Holidays" digital stamp that's a png image, so you can use it to create layers.

I started from the background. I created my first layer with salvaged patina Distress spray stain, then I stamped Honey Bee Stamps  "Farmhouse Check Background" stamp with villainous potion Distress Oxide ink and I heat embossed with the same color of embossing glaze.

I then printed the adorable bears and a sentiment from the "Together for Holidays" digital stamp set, I colored them with alcohol markers and I fussy cut them. 

I put everything together with a mix of liquid glue andfoam tape and that's all!

I hope you'll enjoy the card and don't forget to hop with us for a chance to win. Winners will be announced on November 30th on Crescent Creation's channel community post and Instagram.

Your next stop is Tammi Cremeans’ YouTube channel..

Thank you so much for playing with us today. Hugs, Silvia.

venerdì 19 novembre 2021

"YOU ARE AWESOME" FEATURING SPELLBINDERS

 Hi there! 

Today I'm here with my second card as Spellbinders guest designer.

This time I made a card with the awesome “Embroidery Flowers” stamp set.

I started cutting a strip from Distress white heavystock. I then spray victorian velvet and salvaged patina Distress spray stain on my craft mat, I taped the flower on it, I stamped on the paper and I dry with a heat gun.

I also used the left over drops of inks to add extra texture splattering them around the flower.


These flowers have a wonderful texture on them, so i decided to restamp them on my colorful ones with hickory smoke Distress archival ink.


I cut a black card base. I glued my stamped panel on it (I darkened edges with a soft toch of gathered twigs Distress ink before) and I splattered with brushed pewter Distress paint.


I heat embossed a sentiment in silver, I attached it to the card with some foam tape and that's all.


Thank you so much for come back here again today, I hope you'll enjoy this new card.
Hugs, Silvia.


SENDING YOU HEAT EMBOSSED HUGS

Hello crafty friends and welcome back to my blog.

I'm so excited today for being part to the amazing collaboration between Time for Tea Designs and Wow! and we are going to celebrate it with a blog hop full of inspirations!

To celebrate this fun collaboration both WOW! Embossing Powder and Time for Tea Designs will be giving away a gift voucher for their stores!

WOW! will be offering a £/$20 voucher for either US or UK sites and Time for Tea Designs will be offering a £20 voucher to its store .

All you need to do to be in with a chance of winning is leaving a comment on this blog post by 23/11/21 For more chance to win, hop through to each designers' post and leave comments there too!

We will choose winners by 25/11/21 and they will be announced by both brands over their blog and Instagram.

If you have fallen in love with any of the products  from either brand, you'll find money off vouchers throughout the hop for you to use whilst shopping! Mine is T4TSILVIA10.

The next stop in this hop is the wonderful Dunja Trautman.

Be sure to head over and see what inspiration they have to share!

If you'd rather, you can head over to Wow! Embossing Powder blog to start from the beginning of today's hop!So....let's start the fun!

I started making my card cutting a  4"x5,25”rectangle from white cardstock. I then applied Wow! Clear Ultra Slow Drying embossing ink on it throught Time for Tea "Spring Mandala" stencil and I heat embossed it with Wow! Opaque Bright White Super Fine embossing powder.

I used villainous potion and seedless preserved Distress Spray Stains to card color to my card base and I set it aside.

Next I heat embossed a pice of black cardstock with Wow! Disco Ball  powder and I die cut  the "HUGS" word from it with T4T "Hugs Sentiment” die set.

I put everything together and voilà my finished card.


I hope you'll enjoy it and don't forget to hop with us for a chance to win beautiful prizes from both company.

Have an amazing day!

Hugs, Silvia.

giovedì 18 novembre 2021

NEW START WITH SPELLBINDERS PAPER ARTS

Hello crafty friends and welcome back to my blog!

I'm so excited to be here sharing with you my first project as Spellbinders guest designer.

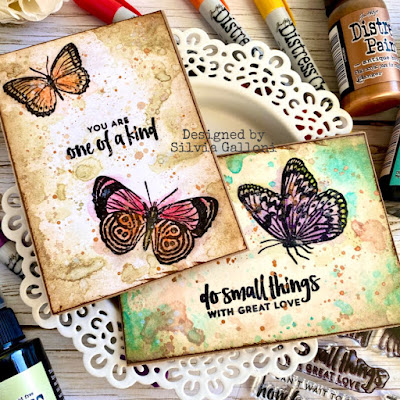
Today I'd like to showcase the beautiful "New Start" stamp set that I used two make two cards.


For the first one I cut a piece of Distress white heavystock in a 5"x3,5" rectangle and I used my Misti to stamp two butterfly and a sentiment with black archival ink on it (remember to leave stamps exactly where they are).

I then started to add some color on my panel with old paper Distress spray stain and I watercolor butterfly with the new peppermint stick, flickering candle and jack-o-lantern Distress mica crayons.

At this point I put my panel into the Misti again and I restamp my images to get a much intense black.

I darkened edges with gathered twigs Distress ink and I splattered with picket fence Distress spray stain and antique bronze Distress paint.


I used the same process to make the second card, I only changed a few things. 

First of all I used a Distress mixed media piece of paper


I colored my background with salvaged patina and tattered rose Distress spray stain, I watercolored the butterfly with hocus-pocus and bubbling cauldron Distress mica crayons and I heat embossed everything with Distress Frosted Crystal.

Thank you so much for passing by today and stay tune 'cause I have another card featuring one of the new Spellbinders stamp set to share with you.

Big hugs, Silvia.

lunedì 8 novembre 2021

WINTER WISHES

Hello my crafty friends!!!! 

I'm back here today to share with you the second card I made as Scrappy Tails Crafts guest designer.

For this card I decided to play with the beautiful "Winter Essentials" die set.

I first created my background with Distress Spray Stains and watercolor cardstock. I used pumice stone for the bottom and victorian velvet, seedles preserved and aged mahogany for the top. I also darkened edges with black soot Distress Oxide ink.

I then used one of the snowflake die to create my own stencil and make a beautiful pattern on the cardbase with some white ink.

I die cut the reindeers and sentiment twice from white carstock and I glued them one above the other to create a bit of dimension.

I put everything together and I added some Distress Mica Flakes here and there to make everything magical.


That's all for today. Thank you so much for stopping by taking a peek, I hope you like it.

Big hugs, Silvia.